Category: McFile

14 Feb

Alerts system

Gabriel Morgado McFile 0 Comments

Hello! Did you know that it is now possible to create alerts for records in McFile? With this system, you no longer need to memorize when you need to take action on a document. Just create an alert in McFile and that’s it! You will never miss a deadline again!


Creating an Alert

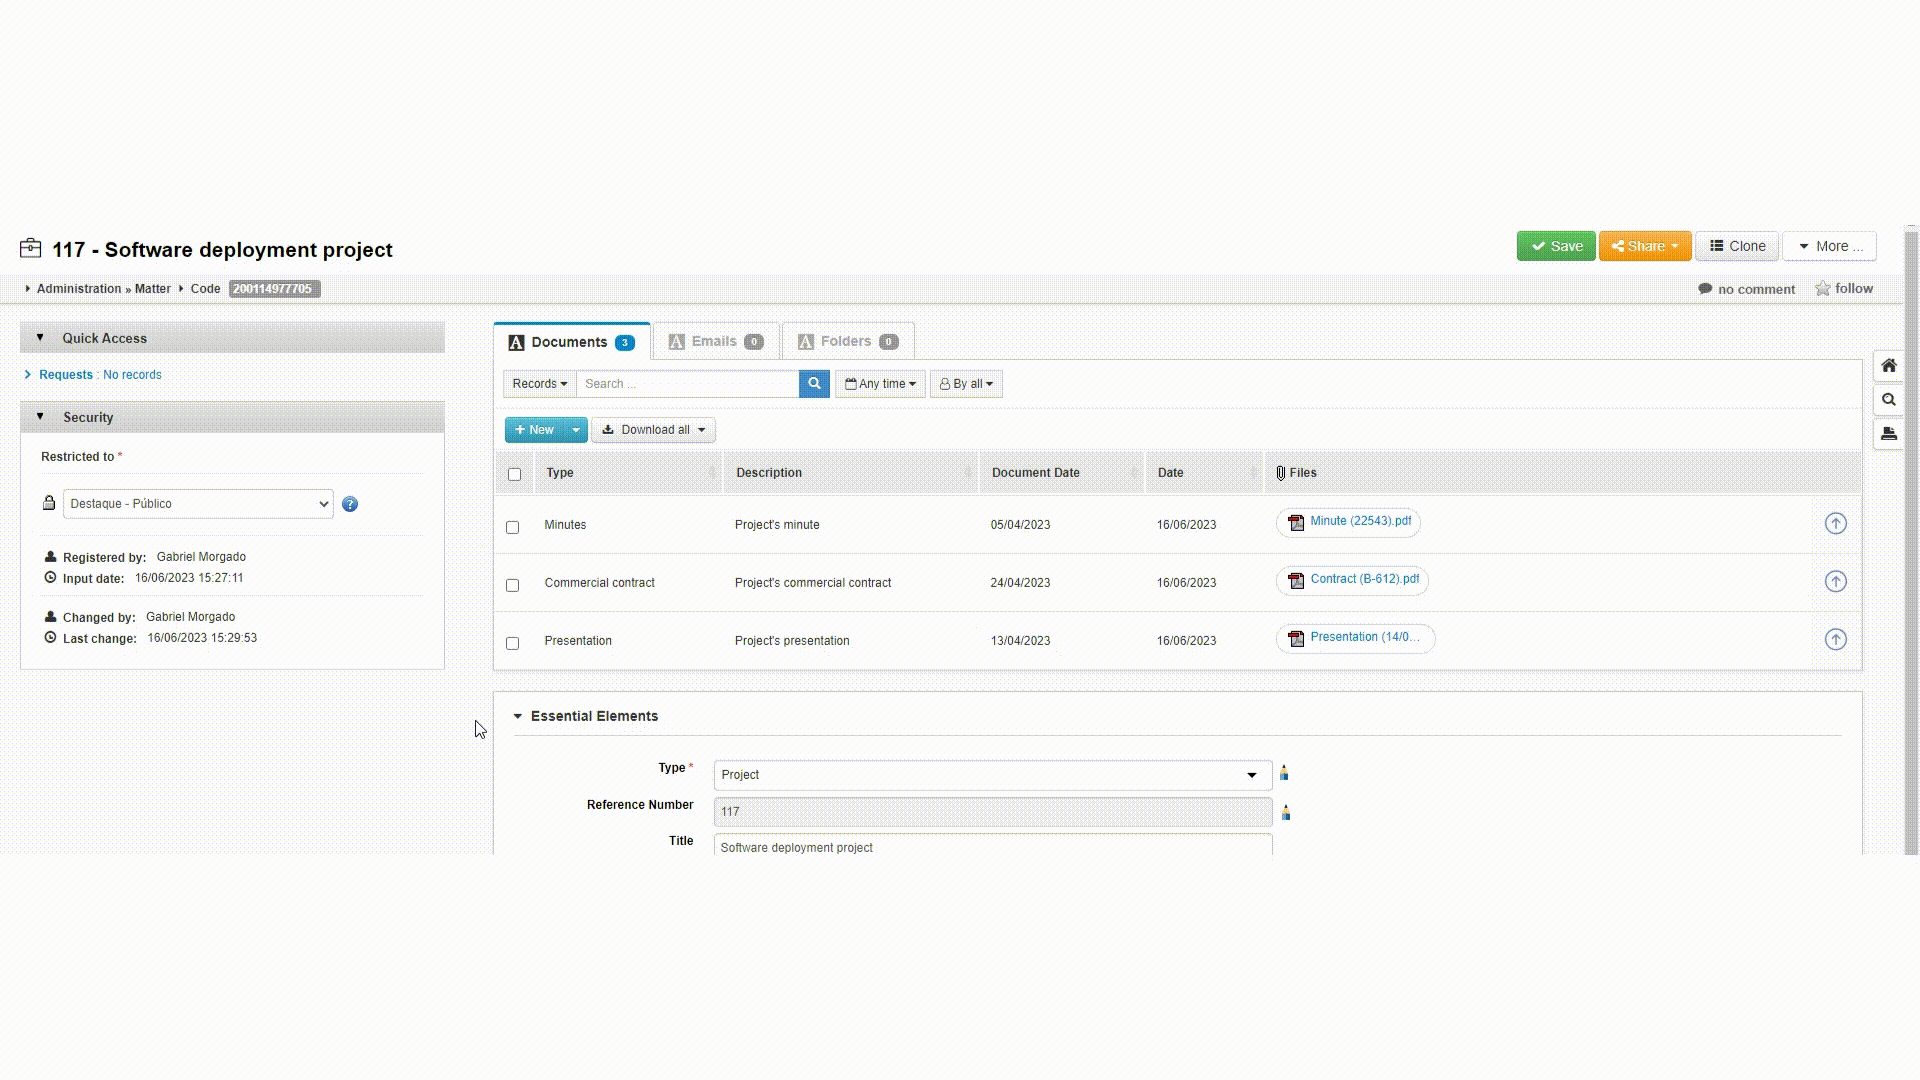
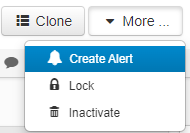
The process of creating an alert is very simple: open the record you want to receive the alert for, click on the “More…” option in the upper right corner and select “Create Alert”.


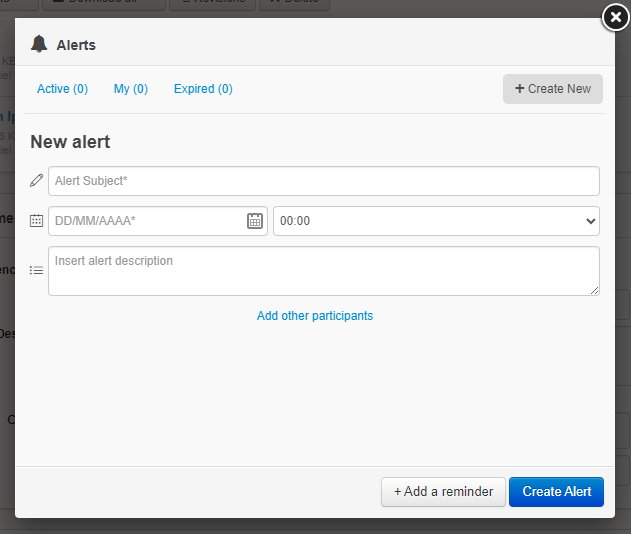
A box will appear on the page where you can configure your alert. Give it a name, set a date and time, and if you want, also add a more detailed description to help you remember what you need to do. You can also add other users or even entire social groups to receive this alert, both by clicking on “Add other participants”.

After filling in the required Subject and Date fields, you can click on the “+ Add a reminder” option to add periodic reminders about your alert.

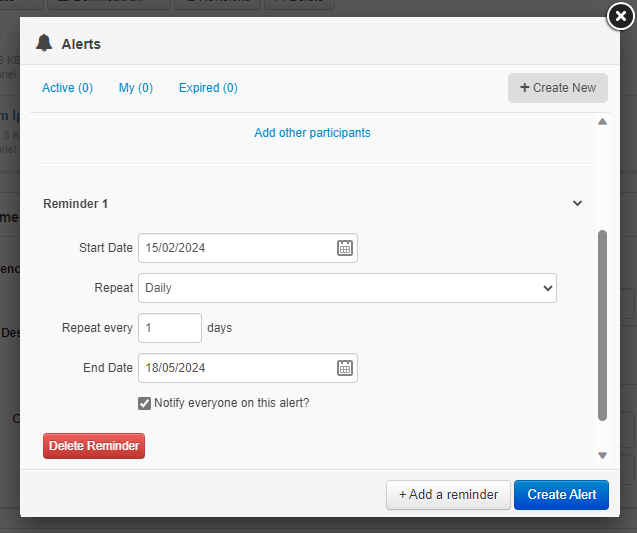
These reminders can be set up as a single occurrence, repeated at configurable daily intervals, or even on specific days of the week or month. You can also define the reminders to occur only during a range of days leading up to the alert execution, and choose whether only you or all participants receive the reminder.

Finally, click on the blue box “Create Alert” to finish creating the alert.

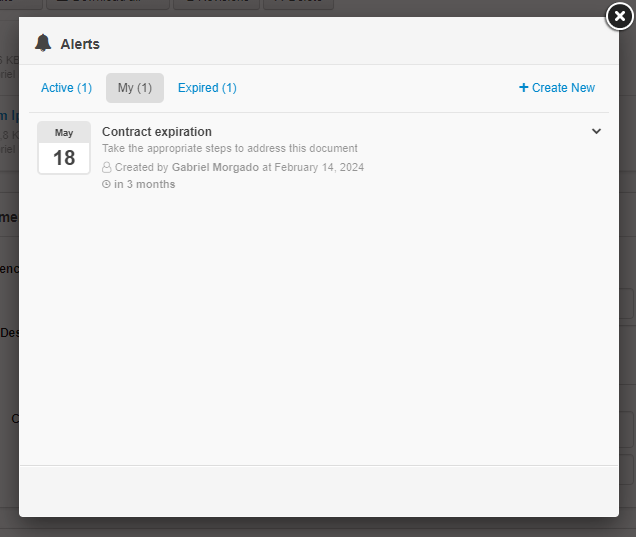
It is also in this menu that you can check the list of active alerts for the record you are viewing. They are separated into active alerts – those that have yet to occur, alerts created by you, and expired alerts – those that have already happened.

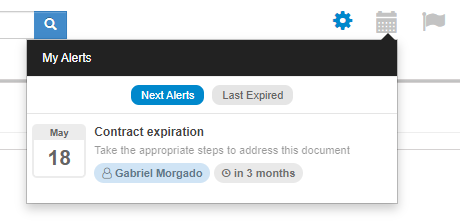
When the reminder time comes, you will receive an e-mail with a link to the record and also a notification in the new McFile alerts calendar. The calendar is located next to the social notifications and you can use it to check your future alerts for all records, plus check which alerts have already expired. And that’s it! As I said at the beginning, you no longer have to worry about deadlines in your documents.


If you want tips on when to use alerts, try creating some for documents that need changes in the future, contracts that will expire, deadlines for customer service, or just for records that you want to remember to visit.

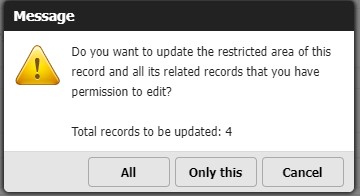
If you have any questions about alerts, we are available through chat support and also via email, where we will help you with whatever you need.

See you next time!

18 Jan

E-mail preferences

Gabriel Morgado McFile 0 Comments

Hi! Today’s blog post is about a tip that can be very useful to you.

Did you know that you can configure which e-mails you receive from McFile? From social notifications to restricted areas, you can have total control over everything that happens in your environment. Ready to understand how it works?

‎‎‎‎‎‎‎‎ㅤ

Configuring you e-mails

To see which e-mails you will receive, simply access the “My account” option in the user menus and then select “Email Preferences” in the sidebar.

Access My account

Email preferences


McFile sends e-mails in the following cases:

  • When a new user is registered or an existing user is updated;
  • A new user is added to a restricted area that you have access to;
  • There are pending tasks in the file module, such as digitization requests and document entry;
  • Import reports are generated;
  • You would receive notifications from the McFile social module, such as comments on documents and social groups;
  • There are pending tasks in the library module, such as loans and returns.

By default, the sending of e-mails for social notifications is disabled, but you can receive them if you wish.

Choosing which e-mails you want to receive is simple, just check or uncheck the checkboxes next to the e-mail types and click “Save”. You are not required to receive any e-mails, just as you can check all the boxes and receive notifications about various actions in the system!

Oh! Remember that some types of e-mails are restricted to certain user types. Only administrators are alerted about changes in users and user registrations, for example. So, if you don’t see some of these options, don’t worry.

Finally, it is important to know that e-mails do not replace the internal notifications of the platform! You will continue to receive them and you can access those by clicking on the flag icon in the top menu, next to the user menu.

If you have any questions about e-mail preferences, please contact our support and we will help you with whatever you need.

See you next time!

25 Aug

McFile mobile app

Gabriel Morgado McFile 0 Comments

Have you heard of the McFile mobile app? Available for Android and iOS devices, it is our solution for users who want quick and efficient access to McFile’s features.

From searching to uploading documents, from sharing to offline access, the app offers a great range of functionalities. Let’s see how it works?


App - Main screen

The first screen of the system displays a list of all registers that the user has access to, separated by categories. Here, the user can search for registers using the magnifying glass icon in the upper right corner. The icon to the left of the magnifying glass is a new feature of the app: barcode search. Clicking on it opens the screen to scan a barcode generated by McFile, taking the user directly to the register associated with that code.

Finally, clicking on a document type takes the user to the screen with all the registers of that type, while clicking on the yellow bar at the top allows you to change the restricted area being viewed.


App - Document screen

Now, in a list with registers, the user can click on one of them to view the data and associated files, as well as add new files, just like in the conventional McFile. For convenience, each document has a sharing button that can be used to generate direct links to that register or file. It’s also possible to download files, allowing them to be accessed on the device even without an internet connection. The files available in this way can be found by clicking on the “folder” icon at the bottom of the first screen of the system.


App - Upload screen

Back to the home screen, if the user wants to quickly upload a file from their device to McFile, simply click on the “+” symbol in the lower right corner. The user can then upload an image or file to the system or even take a photo of what they want to save, only needing to specify in which register to place the uploaded files.

Oh! It’s worth mentioning that users can also send files to the system without opening the app first! Just use the mobile device’s file-sharing function and select McFile as the destination.


App - Notifications screen

The “bell” icon opens the screen of alerts that the user has received. Here, you’ll find both notifications sent to the user and the status of tasks and services that the user needs to perform.


App - Screen with services

Furthermore, all the service request features available on the McFile Web are also present in the app. Users can request documents scanning, extraction, and loan services.


And that’s not all! The app is constantly evolving, receiving improvements and new features. For example, we recently added voice search and the ability to request book loans. So, I recommend that you keep an eye on this blog to be the first to know about updates to the app and McFile as a whole. If you have any questions about the app, please contact our support, and we’ll assist you with whatever you need.

Until next time!

03 Aug

Input Checklist

Gabriel Morgado McFile 0 Comments

Hello again, we are back today to bring you some fresh updates straight from our development team!

You know how frustrating it is to design a meticulously organized process, only to see it consistently left unfinished? How hard it is to hand over that contract, only to realize you have to chase down a missing document? That moment when you need an information and it’s been overlooked in the filling form?

Your problems are over!

Now, McFile features an Input Checklist function, ensuring that the creation of a said register only happens after all steps are completed and approval has been issued. This guarantees a flawless process from start to finish. Wonderful, isn’t it?

This feature is incredibly valuable for HR processes such as new employees admissions and terminations. However, its benefits extend beyond this area as other activities, like initiating a new project or entering into a new contract, can also make the most of this feature.

All sounds great, but how does it work?

First, let’s go to the menu and select the matter creation option.

Menu

On this window, we have the Essential Elements menu, which looks very similar to the fields on the regular matter screen, but with some added functionalities. The main one is the “Checklist Type” field, which will be used to define the data and documents that are mandatory to be inserted.

Essential Elements Group

An example would be the employee admission form. We select the matter type (“employee”) and the checklists for admission and workplace safety. Then, we fill in all the mandatory fields, including any new ones that appear after choosing the matter type. On the next screen, the workflow course screen, we choose the next step in the process: File upload.

Workflou course screen

This is the our big update! On this screen, we have the documents belonging to the checklists chosen in the initial step (which we can see in the Type column). On each of the lines, a document must be inserted in order to proceed to the next step.

Documents checklist

Now, the next step: Register Approval. It will be necessary for someone responsible for the workflow (usually a user with the role of a manager) to approve or reject the flow. In case of rejection, it’s mandatory for them to provide a reason, which will be displayed on the document upload screen so that the operator can make the necessary corrections.

Justification for disapproval

Once everything is in order, the workflow is finalized, and the subject is created. Congratulations! You’ve created a complete, valid register. How wonderful!

Matter created message

So, what do you think of this new feature? It’s incredibly useful, right? No more headaches due to missing documents. Here at McFile, it’s always about providing the best for you! If this tool would benefit your team, feel free to reach out to us and ask about its usage and implementation. Our team is always ready to assist you!

13 Jul

McFile Search – Filters

Lucca McFile, Uncategorized 0 Comments

Hey, what’s up! Today’s tip is about the McFile search feature. You can have fine control over search results using filters – and we have various types of filters to help you find the right record!

By Files

You can perform your search by fields within the record or even by file content.

Our powerful algorithms index the text within your files* so you can find them in the blink of an eye!

You can also choose to filter only by file name by selecting the option “Do not search within file content.”

* It’s important to note that only files from the Office suite, EML (emails), RTF, OCR-enabled PDFs, and TXTs are compatible with file content search.

By Module

Right on the search page, you can filter your search within the different McFile modules directly from the sidebar or by using the module filtering button just below the search box.

By Registration Author

You can also filter by records registered by specific individuals or groups.

By Date

Our date filter has been enhanced, and now you can choose which date we’re referring to: “Input Date” or “Last Change” of a record or even the “Date” field within the record.

You can select one of the predefined periods or enter your own Custom Range.

With all these filters, it will be easy and quick to find what you’re looking for in the McFile search! Any questions? Send an email to support@mcfile.com.

16 Jun

Restricted area heritage

Gabriel Morgado McFile 0 Comments

Hello! Today’s blog post is a McFile usage tip.

The partition of documents into different restricted areas is one of McFile’s most important characteristics. It is possible to utilize the restricted areas to separate your documents, so that only selected users have access to a specific group.

Based on this, I present to you the concept of restricted area heritage: upon altering the restricted area of a register, you can simultaneously update all related records to use the new restriction!


Imagine this: You have a large project registered in McFile. Multiple departments in your company use it on a daily basis, so in order for all users to have access, its restricted area (and the one for the documents that make up this project!) is set to public. Now, the project has been completed, and you want to transfer it to an area where only your team of archivists has access. It wouldn’t make sense to transfer the project and leave its files public, right? That’s where the heritage comes in!


It’s a straightforward process to bulk alter restricted areas. Simply navigate to a register that has documents or other records related to it (Company and Matter), update the restricted area of that record, and save the changes. A message will appear on the screen, asking you to choose the desired action: update all related records or only the main one.


And that’s it! With just a few clicks you can manage an entire set of registers without worrying about forgetting one of them.

If you have any questions about the functionality, don’t hesitate to use the support system to get in touch with us.

Until next time!

15 May

New chat and help update

Gabriel Morgado McFile 0 Comments

Hi! It’s time to talk about a McFile update!

You already know that our team is always working to improve the platform, so I’m here today to inform you that McFile now has a new and more robust help chat! It’s possible to use him not only to cast your doubts away over the most common questions about the platform, but also to directly contact our help team. Let’s see how it works, shall we?


You can access the chat by clicking in this icon, located in the bottom-left corner of the screen:

chatIcon


In the “Ask” tab you can contact our support team directly if you wish for us to deal with your issue directly. You can send us your request through an e-mail or you can pick the option to talk with one of us using the chat. It’s also possible for you to read previous chats, giving you an easy way to review past issues and solutions.

chatOpen3


On the other hand, in the “Answers” tab you have access to our help page, filled with many frequently asked questions about McFile and its usage. You just have to use the search bar in the bottom of the chat to search for an article with the solution for your issue. If there’s none avaliable, feel free to talk with us using the “Ask” tab.


Any thoughts about these changes? If you still have any doubts, try using the new chat to contact us! We are always ready to assist you. See you next time!

14 Apr

Bulk download files through McFile

Gabriel Morgado McFile 0 Comments

Hello! There’s a new feature on McFile!

It’s now possible to bulk download your files from the system! To do that, click on the “Download all” button in a Documents tab.


It’s also possible to download only some chosen files. Pick them using the boxes on the left side and click on the download button — that just updated to “Download selected”.


The bulk download option is avaliable in the Document screen, but also on Matter and Company screens. With that, you can download all files with a single action!


Managing your files with McFile is now even easier. And if you still have doubts, feel free to contact us. We are always ready to help. Cheers!

McFile Team.

30 Mar

Resilience – Sending email through McFile

admin McFile 0 Comments

Hello! How you probably know, it’s possible for you to send e-mails directly from McFile. You can use this resource to share links to documents, for example .


And to make your work easier, this process has been updated! Now emails with non-existent address or errors regarding the address, will be notified by the system, by email, application and mobile app.


Here’s an example how the system works when occours an error from a non-existent address or errors regarding the address.


Besides that, you will be notified in the system and the mobile app.