Author: arthurcaccavo

22 Dec

File and Record Lock

arthurcaccavo Uncategorized 0 Comments

Hey! Today we are here with one more fresh product from our development team!

Minding the safety of your processes it’s usual to need that some of your files and records are not altered. For this need we have some tools, like restricted areas, access profile, custom privileges…

However, there are instances whre an information needs to be acccessibel to all, but yet not alterable, and you don’t need to mess with a multitude of individual privileges and restricted area configuration.

For this purpose McFile offers the simple, pratical and effective: File and Record Lock

File Lock

Clicking on the ⋮ (vertical dots) menu and selecting the Lock option you have the following menu:

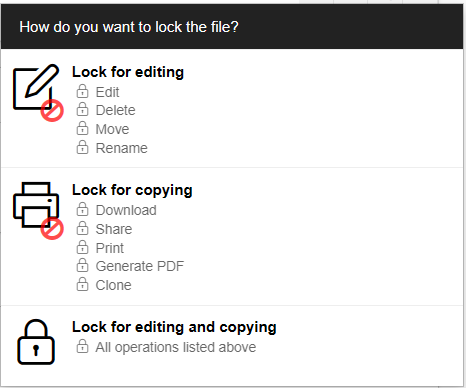
Selecting one of this options you will dissallow:

  • Lock for Editing – Edit, Delete, Move, Rename;
  • Lock for Copying – Download, Share, Print, Generate PDF, Clone;
  • Lock for Editing and Copying – All the above options.

It’s important to note that:

  • Whoever locked the file will still be able to perform the locked actions and can unlock it. Managers and administrators will also be able to unlock them.
  • Only the file creator, managers and administrators can lock files.

Record Lock

The record offers only one lock option at the “More …” menu

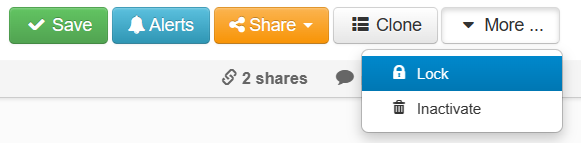
Once locked it will not be possible to:

  • Upload, delete or alter files;
  • Change any fields, including restricted area and file plan;
  • Link any new record to an locked matter or company.

Also, when locking a matter or company you will be prompted to infrom if you want to lock all the linked records or only the current one.

This is all for today! Until next time!

05 Jun

How to import using worksheets

arthurcaccavo Uncategorized 0 Comments

Whats Up! Today we are throwing a #TBT to talk about a tool that has been with us for a long time on McFile 🙂

Worksheet Import is a powerful, wide-used tool. But do you know all it’s application?

Well, first things first, how to get there?

Starting step, Navigating to the admin page ⛵

Now we are here, click on the “Procedures” tab ☝️, done! I bet you tought it wouldn’t be this easy, right? 😄

In this screen it’s possible to have a long list of options. However, today our protagonists are the “import” options, that also can be many but sharing some key features, that we are going to explain to you right now 👨‍🏫

Okay, as you will be able to see, an import procedure always has one registry category coupled up to it. The imports listed on the worksheet will be created on this category, be it Topics, Clients or another. Each one of those options has a Default Worksheet that you can download following the respective link, as shown in the picture below:

Attention! Import procedures only work with their original worksheets found on their respective pages! Do not try to import any other worksheet as it will not work. If it’s the case you will need to transfer your data to the worksheet provided.

Perfect! Now you know everything that you need to run your imports! Now for some final comments:

  • Import procedures are scheduled and may take a while to run. If the data you imported is not yet in the system, please wait, maybe it’s being processed.
  • It’s not possible to stop and import! So always double check your worksheet before starting an import procedure!
  • The “Registered by” user on the imported registries is always the one that started the procedure. That way it’s easy to find and audit any import made.

So what did you think? Any doubts or suggestiond please contact us at suporte@mcfile.com! ‘Til the next time!

02 May

McFile’s REST API Acess and Usability

arthurcaccavo Uncategorized 0 Comments

Here at McFile we are committed to the continuous improvement in the quality of our products. Therefore, we would like to introduce our new API key management form to developers and other interested parties.

But before that, are you familiar with the McFile API? Perhaps you know the old version, but we have been working for some time now on the REST API version, built with the latest industry standards in architecture and security. We are proud to announce that it now has a new feature that will give you full control to build new integrations for your company. To learn more, follow the link: https://apidocs.mcfile.com/

Now, in the user management screen, we have a new section called “Key Management”. Note that each created key will be linked to a user, who will be the user with the noted action in the system.


By clicking on the “add” button, you will have the name field, scope and permission options. Here you have total freedom to configure your key as you wish!

Perfect. Now that you have created your key, you will have access to some quick information directly from the user screen, such as: the name, the scopes to which it has access, when the key was last used and whether it is active or not – you can even deactivate it here without having to open the editing screen! You can also select any number of keys for deletion or click on the edit button to change their scopes.

Please, beware! Now comes an important detail! Really important! Changes made on the user management screen are not storeduntil you click on the “save” button in the upper right corner. This includes creating, editing, and deleting keys (including setting which keys are active or not). So, make sure you save your work before leaving the page, okay? Also, only when clicking the button you will actually receive your key! Remember to copy the key and store it in a safe place, as you will not be able to access it again after leaving this page. For your security and privacy, we do not store your key.

So, what do you think? Are you ready to build the future of your company with McFile? We are excited to see what you will develop! See you soon!