Month: August 2023

25 Aug

McFile mobile app

Gabriel Morgado McFile 0 Comments

Have you heard of the McFile mobile app? Available for Android and iOS devices, it is our solution for users who want quick and efficient access to McFile’s features.

From searching to uploading documents, from sharing to offline access, the app offers a great range of functionalities. Let’s see how it works?


App - Main screen

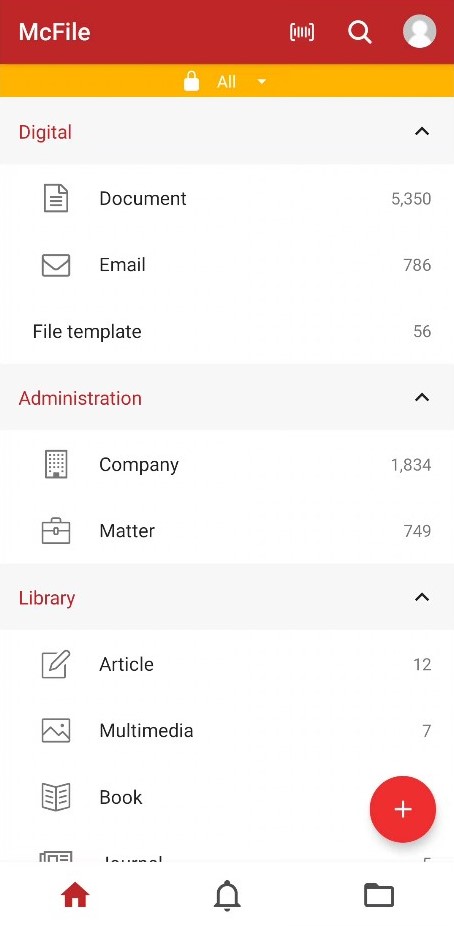
The first screen of the system displays a list of all registers that the user has access to, separated by categories. Here, the user can search for registers using the magnifying glass icon in the upper right corner. The icon to the left of the magnifying glass is a new feature of the app: barcode search. Clicking on it opens the screen to scan a barcode generated by McFile, taking the user directly to the register associated with that code.

Finally, clicking on a document type takes the user to the screen with all the registers of that type, while clicking on the yellow bar at the top allows you to change the restricted area being viewed.


App - Document screen

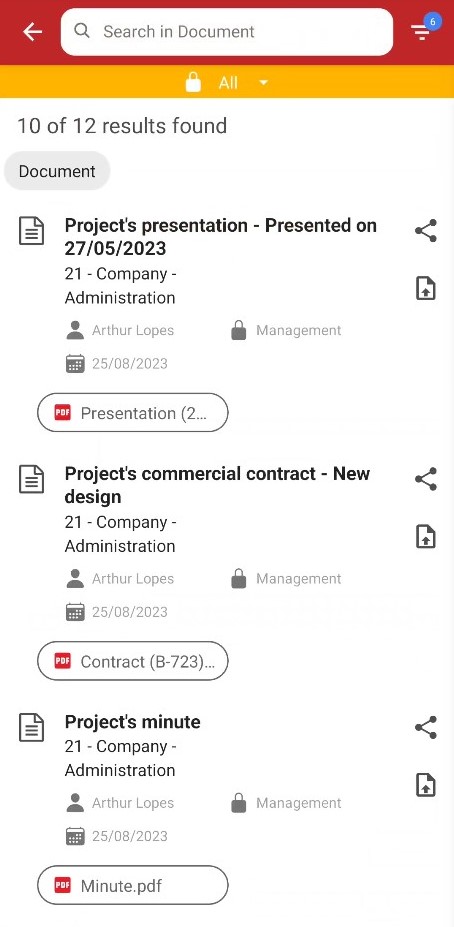
Now, in a list with registers, the user can click on one of them to view the data and associated files, as well as add new files, just like in the conventional McFile. For convenience, each document has a sharing button that can be used to generate direct links to that register or file. It’s also possible to download files, allowing them to be accessed on the device even without an internet connection. The files available in this way can be found by clicking on the “folder” icon at the bottom of the first screen of the system.


App - Upload screen

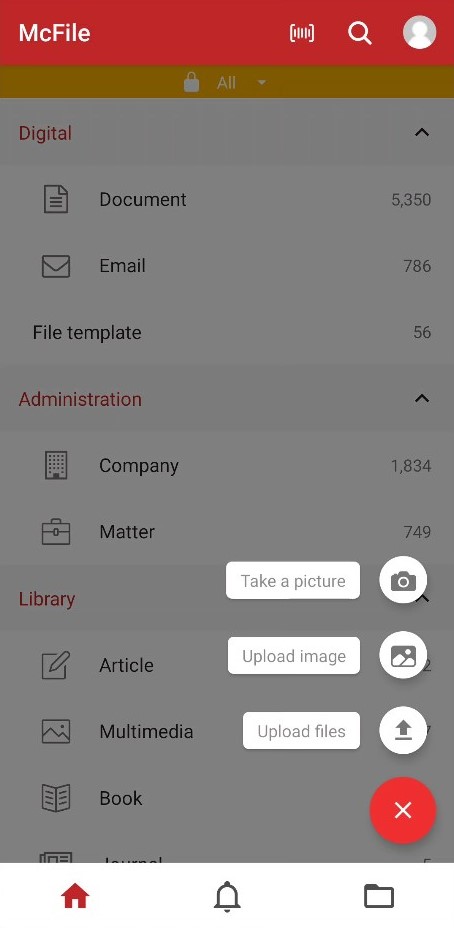
Back to the home screen, if the user wants to quickly upload a file from their device to McFile, simply click on the “+” symbol in the lower right corner. The user can then upload an image or file to the system or even take a photo of what they want to save, only needing to specify in which register to place the uploaded files.

Oh! It’s worth mentioning that users can also send files to the system without opening the app first! Just use the mobile device’s file-sharing function and select McFile as the destination.


App - Notifications screen

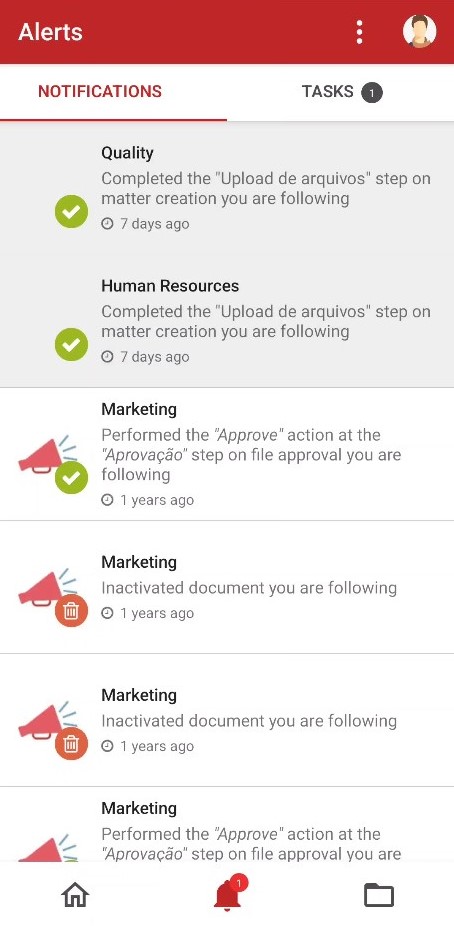
The “bell” icon opens the screen of alerts that the user has received. Here, you’ll find both notifications sent to the user and the status of tasks and services that the user needs to perform.


App - Screen with services

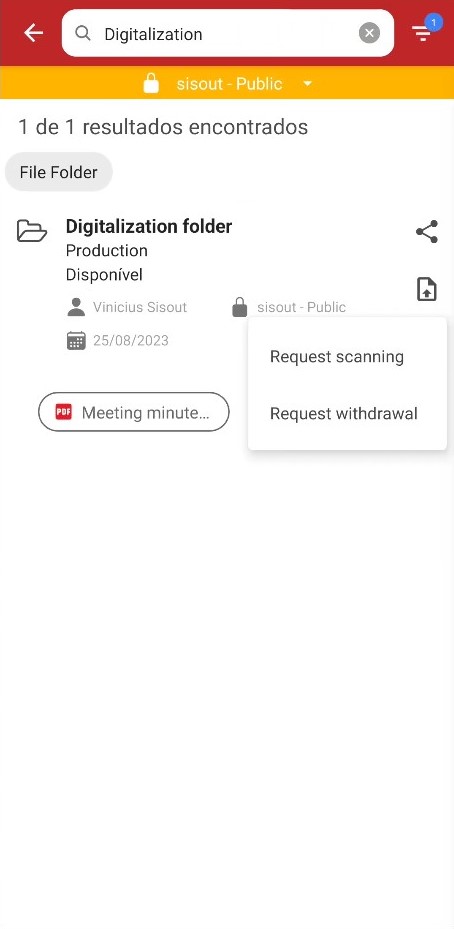
Furthermore, all the service request features available on the McFile Web are also present in the app. Users can request documents scanning, extraction, and loan services.


And that’s not all! The app is constantly evolving, receiving improvements and new features. For example, we recently added voice search and the ability to request book loans. So, I recommend that you keep an eye on this blog to be the first to know about updates to the app and McFile as a whole. If you have any questions about the app, please contact our support, and we’ll assist you with whatever you need.

Until next time!

18 Aug

Digital Signature and Metadata

admin Uncategorized 0 Comments

Greetings! Are you interested in including a digital signature, with long term validation and precise timestamp, to your digitalized documents? Did you know McFile can help you with that?

When this option is enabled, McFile will convert your PDF files to PDF/A when uploaded and include relevant metadata such as the reason for the certificate and the responsible party, as well as a unique hash code to improve security. And most important of all: we offer all this along with long term validation, a technology that checks the certificate’s validity the moment the signature is added, and gives credibility to the document even after that certificate expires.

All you need is a digital certificate to get started. Once you have that, you should go to the admin page, in the top-right corner of the website:

There, search for the Digital Signature panel and fill the required fields, like in the image below. Don’t forget to press the ‘Save‘ button in the top-right corner of the page.

Certificate

And that’s it! Now everyone in your company will be able to add the digital signature when uploading documents in batches, using the certificate provided by you. Whenever an employee wants to add the signature, all they have to do is check the ‘Add digital signature‘ box, like so:


If you have any questions, don’t hesitate to get in touch with us, through suporte@mcfile.com. We will be happy to help! Until next time!

03 Aug

Input Checklist

Gabriel Morgado McFile 0 Comments

Hello again, we are back today to bring you some fresh updates straight from our development team!

You know how frustrating it is to design a meticulously organized process, only to see it consistently left unfinished? How hard it is to hand over that contract, only to realize you have to chase down a missing document? That moment when you need an information and it’s been overlooked in the filling form?

Your problems are over!

Now, McFile features an Input Checklist function, ensuring that the creation of a said register only happens after all steps are completed and approval has been issued. This guarantees a flawless process from start to finish. Wonderful, isn’t it?

This feature is incredibly valuable for HR processes such as new employees admissions and terminations. However, its benefits extend beyond this area as other activities, like initiating a new project or entering into a new contract, can also make the most of this feature.

All sounds great, but how does it work?

First, let’s go to the menu and select the matter creation option.

Menu

On this window, we have the Essential Elements menu, which looks very similar to the fields on the regular matter screen, but with some added functionalities. The main one is the “Checklist Type” field, which will be used to define the data and documents that are mandatory to be inserted.

Essential Elements Group

An example would be the employee admission form. We select the matter type (“employee”) and the checklists for admission and workplace safety. Then, we fill in all the mandatory fields, including any new ones that appear after choosing the matter type. On the next screen, the workflow course screen, we choose the next step in the process: File upload.

Workflou course screen

This is the our big update! On this screen, we have the documents belonging to the checklists chosen in the initial step (which we can see in the Type column). On each of the lines, a document must be inserted in order to proceed to the next step.

Documents checklist

Now, the next step: Register Approval. It will be necessary for someone responsible for the workflow (usually a user with the role of a manager) to approve or reject the flow. In case of rejection, it’s mandatory for them to provide a reason, which will be displayed on the document upload screen so that the operator can make the necessary corrections.

Justification for disapproval

Once everything is in order, the workflow is finalized, and the subject is created. Congratulations! You’ve created a complete, valid register. How wonderful!

Matter created message

So, what do you think of this new feature? It’s incredibly useful, right? No more headaches due to missing documents. Here at McFile, it’s always about providing the best for you! If this tool would benefit your team, feel free to reach out to us and ask about its usage and implementation. Our team is always ready to assist you!